1/31/2015

Using LibreOffice Calc to create pivot tables

A pivot table lets you provide various data viewpoints for analyses and reports. You can create pivot tables through a spreadsheet application, such as Calc in the LibreOffice productivity suite. This document can help you use Calc to:
  1. Create a practice spreadsheet
  2. Create practice pivot tables
  3. Refresh pivot tables
For more information, please see Pivot Table in LibreOffice help.

Creating a practice spreadsheet

A practice spreadsheet can help you learn to create pivot tables. To create your practice spreadsheet, do either of the following:
  • Click Stooge Computers potential profit, click File, click Download as, and then click OpenDocument format (.ods).
  • Open a LibreOffice Calc spreadsheet, and then type a source-data worksheet similar to Figure 1.
    Figure 1 - The main (SourceData) worksheet in your practice spreadsheet.
    You can analyze this information through pivot tables.

Creating practice pivot tables

After you create your practice spreadsheet according to the section above, you can create one or more practice pivot tables as worksheets within your spreadsheet. For example, to view potential profits, you might create two pivot tables:
  • Potential-profit data in Warehouse rows and Product columns
  • Potential-profit data in Product rows and Warehouse columns

Example Warehouse rows and Product columns

To create a practice pivot table that displays potential-profit data in Warehouse rows and Product columns, do the following:
  1. As shown in Figure 2, your SourceData worksheet, select the rows and columns that you wish to make available to your pivot table. In this example, I selected rows 2 through 14 and columns A through H.
    Figure 2 - Starting a pivot table.
  2. Click Data, click Pivot Table, click Start, select Current selection, and then click OK to display a Pivot Table window.
  3. As shown in Figure 3, drag Warehouse into the Row Fields frame, drag Product into the Column Fields frame, and then drag Potential Profit into the Data Fields frame.
    Figure 3 - Defining a pivot table through a Warehouse row field,
    a Product column field, and a Potential Profit data field.
  4. Click OK to display a pivot table similar to Figure 4. This pivot table contains Warehouse rows, Product columns, and Total Results for both.
    Figure 4 - A pivot table that displays potential profits
    through Warehouse rows and Product columns.
  5. As necessary, adjust column widths so you can see all data correctly.
  6. Rename the pivot-table worksheet according to its content, such as PotentialByWarehouse.
  7. Create a second example pivot table according to the procedure below.

Example Product rows and Warehouse columns

To create a practice pivot table that displays potential-profit data in Warehouse rows and Product columns, do the following:
  1. As shown in Figure 2,  your SourceData worksheet, select the rows and columns that you wish to make available to your pivot table. In this example, I selected rows 2 through 14 and columns A through H.
  2. Click Data, click DataPilot, click Start, select Current selection, and then click OK to display a DataPilot window.
  3. As shown in Figure 5, drag Product into the Row Fields frame, drag Warehouse into the Column Fields frame, and then drag Potential Profit into the Data Fields frame.
    Figure 5 - Defining a pivot table through a Product row field,
    a Warehouse column field and a Potential Profit data field.
  4. Click OK to display a pivot table similar to Figure 6. This pivot table contains Product rows, Warehouse columns, and Total Results for both. Note: Figure 6 shows information that is 'pivoted' from that in Figure 4.
    Figure 6 - A pivot table that displays potential profits
    through Product rows and Warehouse columns.
  5. As necessary, adjust column widths so you can see all data correctly.
  6. Rename the pivot-table worksheet according to its content, such as PotentialByProduct.

Refreshing pivot tables

When you create a pivot table, it contains only information that is current at that moment. Therefore, you need to refresh a pivot table after you update its source data. To refresh a pivot table, do the following:
  1. Select the worksheet of the pivot table you wish to refresh. For example, you might select your PotentialByProduct worksheet as shown in Figure 6.
  2. Right-click Filter to display its menu.
  3. Click Refresh to update pivot-table information.

1/27/2015

Promoting Blogger posts through LinkedIn

If you use Google Blogger, you might wish to promote your work through LinkedIn. This document explains how to:
  1. Promote a Blogger post through a LinkedIn post.
  2. Copy a Blogger-post image to a LinkedIn post.

Promoting a Blogger post through LinkedIn

To promote a Google Blogger post through your LinkedIn account, do the following:
  1. In your Chrome web browser, open the Blogger post you wish to promote. Note: Open only a single post. For example, if you are promoting your newest post, open your blog and then click on the most recent post title.
  2. In a new, separate tab, open your LinkedIn Home page.
  3. In the Share an update field, click Create a Post (the pencil icon) to display a Your Posts page similar to Figure 1.
    Figure 1 - Creating a new LinkedIn post.
  4. Type over the Write Your Headline text to create a headline that differs from your Blogger post title. These should only be similar because your LinkedIn post will contain a link to your Blogger post. For example, my LinkedIn post, Chromebook's photo editor applies to my LinkedIn post that includes a link to my Blogger post, Using the Chromebook built-in photo editor.
  5. As shown in Figure 2, type some text that briefly describes your Blogger post.
    Figure 2 - Describing and linking to your Blogger post.
  6. Click your Blogger-post tab, copy its URL (web link). 
  7. Click your LinkedIn-post tab, and then create a link as follows:
    1. Type some link text, such as Please see my recent document, Using the Chromebook built-in photo editor.
    2. Select that link text.
    3. Click Add link (chain icon) to display its dialog.
    4. Paste Your Blogger-post URL into the dialog, and then click Add.
  8. If you wish to add an image from your Blogger post, copy that image according to the section below, click Add image (camera icon), click Upload Image, and then click Open.

Copying a Blogger-post image

If you wish to copy a Blogger-post image to a LinkedIn post, you should first copy that image to your desktop, as follows:
  1. In your Chrome web browser, open the Blogger post from which you wish to copy an image.
  2. Right-click the image you wish to copy.
  3. Click Save image as to display a Save File window.
  4. Select your desktop folder, and then click Save to download the image to your desktop.

1/25/2015

Using LibreOffice Calc to create an idea matrix

An idea matrix, also called a verb-noun matrix, can help you organize your initial thoughts about almost any unfamiliar subject. This document explains how to:
  1. Create an idea matrix through Calc, the spreadsheet application within the LibreOffice productivity suite. 
  2. Generate new and unexpected ideas through your idea matrix.
Although you can use pencil and paper to create an idea matrix, using a spreadsheet application is easier and faster.

Note: Procedures in this document specifically apply to LibreOffice Calc, and generally apply to other spreadsheet applications, including Google Drive Sheets and MS Office Excel.

Creating an idea matrix

To create an idea matrix through LibreOffice Calc, you need to format matrix cells and then set up matrix concatenation.

Formatting matrix cells

Formatting matrix cells make them easier to use. To format your matrix cells, do the following:
  1. Open a new Calc spreadsheet. 
  2. As shown in Figure 1, select cells A1 through F6, and then:
    1. Click Format, click Cells, and then click the Alignment tab.
    2. Under Properties, select Wrap text automatically.
    3. In the Horizontal dropdown menu, select Left, in the Vertical dropdown menu, select Middle, and then click OK.
    4. Click Format, click Cells, and then click the Borders tab.
    5. Under Spacing to contents, set all four sides to 4.0pt, which makes the cells easier to read.
      Figure 1 - Selecting cells A1 through F6.
  3. Select cells A2 through A6, click Format, click Cells, click the Alignment tab, and then, in the Horizontal dropdown menu, select Center, and then click OK
  4. Select cells B1 through F1, click Format, click Cells, click the Alignment tab, and then, in the Horizontal dropdown menu, select Center, and then click OK

Setting up matrix concatenation

An idea matrix generates each possible idea by using the CONCATENATE() function to combine a verb, a blank space, and a noun into a phrase. To set up matrix concatenation, do the following:
  1. Format matrix cells according to the section above. 
  2. As shown in Figure 2, select cell A1, type Nouns at right and Verbs below, and then adjust the width of column A.
    Figure 2 - Typing the CONCATENATE() function into cell B2.
  3. In cells A2 through A6, type five placeholders for verbs, v1 through v5; and in cells B1 through F1, type five placeholders for nouns, n1 through n5.
  4. Select cell B2, and then type =CONCATENATE($A2," ",B$1) to display "v1 n1" in cell B2. Note: This cell is displaying the placeholder verb from A2, a blank space, and then the placeholder noun from B1.
  5. As shown in Figure 3, copy cell B2 and then paste it into cells B3 through B6.
    Figure 3 - Copying the CONCATENATE() function into cells B3 through B6.
  6. As shown in Figure 4, copy cells B2 through B6 and then paste them into cells C2 through F6.
    Figure 4 - Copying the CONCATENATE() function into cells C2 through F6.
  7. Rename the worksheet to Base 5 by 5 and then copy it one or more other sheets, such as Idea 1, Idea 2, and Idea 3. Note: You can make a larger idea matrix by simply copying and pasting new rows and/or columns.

Generating ideas through your matrix

Assume that a professor has asked you to write an essay about steam-locomotive maintenance. Unless you have recently worked on a steam locomotive, you can use your idea matrix to generate new or unexpected ideas that help you start your research. You might use a procedure similar to the following:
  1. Create an idea matrix according to the sections above.
  2. As shown in Figure 5, type as many as five verbs (or verb phrases) into cells A2 through A6, overtyping the placeholders for verbs.
    Figure 5 - An example idea matrix for 'steam-locomotive maintenance.'
  3. Type as many as many as five nouns (or noun phrases) into cells B1 through F1, overtyping the placeholders for nouns.
  4. Examine the idea matrix to see whether any of its generated ideas are worth keeping. If so, either write down those ideas or print the idea matrix and then circle its best ideas. If not, repeat steps 2 through 4 until you see one or more useful ideas.

1/16/2015

Using the Chromebook built-in photo editor


Your Chromebook has an easy-to-use, built-in photo editor that launches automatically when you select a photo or other graphics image to view and/or edit. This document can help you learn to use your Chromebook photo editor.

The Chromebook photo editor lets you make basic edits. For more advanced editing, such as converting image file types, you will also need to use a separate editor such as the GNU Image Manipulation Program (GIMP). Please also see How to use the Free Online Photo Editor.

Selecting an image

To select an image, do the following:
  1. Log onto Chromebook.
  2. Click the Apps launcher, at the lower left, to display its window.
  3. Click the Files app to display its window and your Downloads folder.
  4. Find an image file you wish to select for viewing or editing. Note: The file need not be in Downloads; it can be in any folder.
  5. Double click the image file to launch the photo editor and simultaneously display your selected image as shown in Figure 1. Note: You can use the forward and backward arrows to display other images within the same folder.
Figure 1 - Viewing an image file

Editing an image

To edit an image, do the following:
  1. According to the procedure above, select an image you wish to edit.
  2. Click the pencil icon to display seven editing tools centered under the image as shown in Figure 2.
    Figure 2 - Editing-tool icons
    Left to right, these editing-tool icons are:
    • Auto-fix (lightning bolt)
    • Crop
    • Brightness (also lets you adjust Contrast)
    • Left (rotate)
    • Right
    • Undo
    • Redo
  3. Click an editing-tool icon to make a change to your image.  For example, you can click Crop, press Enter, and then select a rectangular image segment as shown in Figure 3.
    Figure 3 - Cropping an image
  4. Close the Chromebook photo editor to save your edited image, such as Figure 4, in the same folder in which you have been working.
    Figure 4 - Cropped image

1/13/2015

How to use the Free Online Photo Editor

You can use the Free Online Photo Editor to edit your photos and other graphics images quickly and easily. You need only upload an image file, edit it, and then download it.

Uploading an image file

Before you can edit an image through the Free Online Photo Editor, you need to upload an image file into the editor as follows:
  1. Go to FreeOnlinePhotoEditor.com.
  2. Select an image file: from either your computer or the internet:
    • To select an image from your computer, click Browse to find an image file and display its name in the Choose file field.
    • To select an image from the internet, type the URL of the image file in the Enter URL field.  
  3. Click OK to upload your selected image file into the Free Online Photo Editor as shown in Figure 1.
  4. Edit your image file according the Editing an image file section below.
Figure 1 - An image file uploaded into the Free Online Photo Editor

Editing your image file

After uploading your image file, you can edit it in the Free Online Photo Editor. Its toolbar has six menus (Basic, Enhance, Colors, Borders, Filters, and Effects) and a Text utility. To edit an image file, use the following general procedure.
  1. Click a toolbar item, such as Basic, to display its menu.
  2. Click a menu item, such as Crop, and then follow its instructions.
  3. Repeat steps 1 and 2 to make adjustments to your image until you are satisfied with your edits.
  4. Download your edited image file according the Downloading your edited image file section below.
Note: To create Figure 2, I used the Basic menu to make Resize, Crop, and Brightness/Contrast adjustments; and the Borders menu to add a Colored border.

Figure 2 - An edited image file

Downloading your edited image file

After editing your image file through the Free Online Photo Editor, you need to download it into your Downloads folder on your computer as follows:
  1. In the Free Online Photo Editor, click File to display its menu.
  2. Click Save as (file type) to download your image file. For example, you could click Save as JPG.
  3. Go to your Downloads folder, and then open your edited image file to verify it downloaded correctly.

1/07/2015

Taking and uploading Chromebook screenshots

This document can help you take, inspect, and then upload Chromebook screenshots. When you take a screenshot, Chromebook automatically saves it as a Portable Network Graphics (PNG) file in your Downloads folder. After inspecting the screenshot, you can make it more accessible by uploading it to Google Drive.

Taking a screenshot

To record content displayed on a Chromebook screen, you can take either a full or partial screenshot.

Taking a full screenshot

To take a screenshot of a full Chromebook screen, do the following:
  1. Display the screen that you wish to record.
  2. As shown in Figure 1, press Ctrl+[switch windows] to take the screenshot and display a brief 'screenshot-taken' message.
    Figure 1 - Full screenshot keys
  3. Inspect your screenshot according to the Inspecting your screenshot section below.

Taking a partial screenshot

To take a screenshot of only part of a Chromebook screen, do the following:
  1. Connect a mouse to your Chromebook. Note: Though you can use the touchpad for this procedure, I recommend a mouse because it makes drag-and-drop tasks much easier. 
  2. Display the screen that you wish to record.
  3. As shown in Figure 2, press Ctrl+Shift+[switch windows] to replace your mouse pointer with a small cross symbol.
    Figure 2 - Partial screenshot keys
  4. Select the area of your partial screenshot as follows:
    1. Move the cross to any corner of the area you wish to record.
    2. Click and hold the left mouse button
    3. Drag the cross until the selection box encloses the screenshot area precisely.
    4. Release the left mouse button to take the screenshot and display a brief 'screenshot-taken' message.
  5. Inspect your screenshot according to the Inspecting your screenshot section below.

Inspecting your screenshot

Inspecting your screenshot immediately helps save time; reconstructing your project's current conditions later might be difficult. To inspect your screenshot, do the following:
  1. Take a screenshot according to the Taking a screenshot section above.
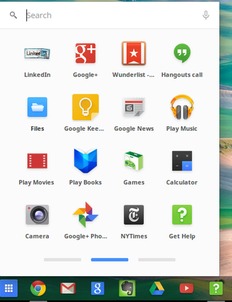
  2. As shown in Figure 3, click the Apps launcher (at lower left of the desktop) to display your apps.
    Figure 3 - App icons on Chromebook
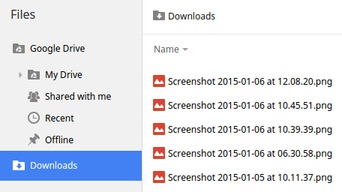
  3. As shown in Figure 4, click the Files app icon to display its window.
    Figure 4 - Downloads folder with screenshots
  4. Within your Downloads folder, double-click your screenshot to view it in Chromebook's built-in photo editor:
    • If the screenshot appears as you had intended, close the editor, and then take whatever other screenshots you need for your current project.
    • If the screenshot does not appear as you had intended, close the editor, delete the screenshot file from the your Downloads folder, and then take that screenshot again.
  5. Continue according to the Uploading screenshots to Google Drive section below. 

Uploading screenshots to Google Drive

You can use any computer to access your Google Drive applications and files through your Google account. Therefore, uploading your Chromebook screenshots to Google Drive makes them easily available for use in your various projects, such as word-processor documents and web sites. To upload your screenshots to Google Drive, do the following:
  1. Click the Apps launcher to display your apps, and then click the Drive app to open it.
  2. Click New, and then click File upload to display its window.
  3. Select the Downloads folder, and then select one or more screenshot PNG files that you wish to upload.
  4. Click Open to upload your screenshot(s).

1/02/2015

Working offline through your Chromebook

You can work offline to perform various tasks through your Chromebook. For example, you can create and edit Google Drive documents offline. This document can help you practice using Chromebook to edit a document offline. To demonstrate offline editing, you can concurrently edit the same document through both Chromebook and any other computer.

Temporarily taking Chromebook offline

To test working offline through your Chromebook, you can temporarily disconnect its Wi-Fi.  To take your Chromebook offline, do the following:
  1. Click your user icon at the lower-right corner of the Chromebook screen to display a window similar to Figure 1.
    Figure 1 - Click your active network to start disconnecting it.
  2. Click Connected to (your_network_name) to display a window similar to Figure 2.
    Figure 2 - Click your network name to continue 
    disconnecting Wi-Fi (if online), or to connect it (if offline).
  3. Click your_network_name to display a Connected window similar to Figure 3.
    Figure 3 - Click "Disconnect" to take your Chromebook offline.
  4. Verify that Automatically connect to this network has been selected (check marked). Note: This automatically reconnects Wi-Fi when you boot your Chromebook.
  5. Click Disconnect to take your Chromebook offline.
  6. Continue according to the Using Chromebook offline section below.

Placing Chromebook back online

Any time after going offline according to the Temporarily taking Chromebook offline section above, you can place your Chromebook back online as follows:
  1. Click your user icon at the lower-right corner of the Chromebook screen.
  2. Click no network to display a window similar to Figure 2.
  3. Click your_network_name to reconnect Wi-Fi and put your Chromebook back online.

Using Chromebook offline files

Even while your Chromebook is offline, you can use its Google Drive app to create and/or edit files in Google Docs, Sheets, Slides, or Drawings. You can see these files only while Google Drive is open. When you go back online, your internal (offline) Drive files sync with your external (online) files.

As shown in Figures 4 through 6, I have experimented with Chromebook writing and editing, both offline and online, and with a separate computer. To make similar experiments, try the following:
  1. Take your Chromebook offline according to the Temporarily taking Chromebook offline section above.
  2. Open the Google Drive app, and create or edit a test document, such as offline test. Because your Chromebook is still offline, you cannot yet see your offline test, or its edits, through a separate computer, such as a Linux PC.
  3. Place your Chromebook back online according to the Placing Chromebook back online section above. You should now be able to see, and edit, offline test through a separate computer.
  4. To make and observe more edits to offline test, repeat steps 1 through 3 as often as necessary.
Figure 4 - Writing through Chromebook, offline then online.
Figure 5 - Adding a third paragraph through a separate computer,
and then a fourth through the offline Chromebook.
Figure 6 - The green marker indicates that I am a separate user.

How to keep your Chromebook cool

Most Chromebooks (and other laptop computers) have underside cooling vents. If you accidentally block these vents, even partially, you risk overheating your Chromebook. This brief document can help you avoid that problem.
This is the left-front cooling vent under my Chromebook.
I am sharing this information through personal experience. Two years ago, when my Chromebook was new, I tried keeping it on a folded blanket while using it.
A soft surface, such as blanket can block
your Chromebook's vents, which causes overheating.
The soft, fluffy surface blocked the vents and overheated my Chromebook. When it failed suddenly and completely, I wondered whether I had ruined it. Fortunately, I was able to recover it according to the instructions in Google's Use the Chromebook Recovery Utility.

To avoid blocking your Chromebook's cooling vents, use it only a solid surface, such as a table or any other flat surface. For example, I found an inexpensive cutting board on which to place my Chromebook.
A plastic cutting board, or similar flat
surface can keep your Chromebook cool.