7/31/2011

Why not use a desktop computer?

I grow rather tired of almost every 'computer authority' online continually stating that "desktop computers are dead." I strongly disagree, for several reasons:
  • Desktop computers are less expensive than portable devices that have comparable capabilities.
  • Peripherals for desktops are easier to use. Larger displays are more readable than smaller screens. Mice are are more precise than touch pads. Full-size keyboards are much more fun than their miniature emulators.
  • A desktop PC can help you save additional money through open source software, such as Ubuntu (a free Linux operating system) and LibreOffice (a free alternative to M$ Office). For example, you can order a desktop PC without an operating system, and then install a Linux operating system and whatever open-source software you need.
  • Desktop PCs are easier to repair than most portable devices.
  • Some new desktop PCs, such as the Zotac ZBOX Mini PC occupy little space and consume little power.

5/28/2011

Using Shutter to take screenshots in Linux

The procedures in this document can help use the Shutter screenshot tool for Linux. You can capture your entire desktop, an active window, or any rectangular area you select. Shutter lets you save your screenshots directly as JPEG image files. In contrast, pressing PrtScn (Print Screen) to capture a desktop, or Alt+PrtScn to capture an active window, lets you save your screenshot only as a PNG file. If you want a JPEG, you must separately convert it from a PNG.

You can install Shutter through the software-application catalog in your Linux operating operating system. For example, for Ubuntu, you can use the Ubuntu Software Center.

Configuring Shutter
To configure Shutter, do the following:
  1. Open Shutter to display its window as shown in Figure 1.
  2. Click the down arrow at the right of Selection, and then select Advanced selection tool. This lets you resize your selection rectangle before you take a screenshot.
  3. In the Shutter toolbar at the top of the desktop, click Edit, and then click Preferences to display its window as shown in Figure 2.
  4. Set Image-format to jpeg, Directory to Desktop, select (check mark) Include cursor when taking a screenshot and then set the capture delay to 15 seconds.
Figure 1 - Shutter lets you take a screenshot as a Selection, Desktop, or Window.
In Ubuntu 11.04, the Shutter toolbar is above your desktop, at the left.
Figure 2 - My recommended Preferences are setting Image-format to "jpeg,"
Directory to "Desktop," selecting (check marking) "Include cursor when
taking a screenshot" and setting the capture delay to "15" seconds.
Capturing your desktop
To take a screenshot of your desktop through Shutter, do the following:
  1. Start Shutter, click the down arrow at the right of Desktop, and then click Capture all Workspaces to take the screenshot and place an icon for its new JPEG on your desktop.
  2. In the Shutter window, close the image tab by clicking on its X, and then minimize the Shutter window.
  3. Double-click the new icon to display an image similar to Figure 3.
Figure 3 - A desktop screenshot.
Capturing an active window
To take a screenshot of an active window through Shutter, do the following:
  1. Select a window to activate it. For example, I activated the Calculator window as shown in Figure 3.
  2. Start Shutter, click the down arrow at the right of Window, and then click "Active Window" to take the screenshot and place an icon for its new JPEG on your desktop.
  3. In the Shutter window, close the image tab by clicking on its "X," and then minimize the Shutter window.
  4. Double-click the new icon to display an image similar to the fourth image above.
Figure 4 - An active-window screenshot.
Capturing a rectangular area
To take a screenshot of a rectangular area through Shutter, do the following:
  1. On your desktop, group whatever items you plan to include in your captured rectangular area.
  2. Start Shutter, click Selection, use your mouse to draw a rectangular area, and then press Enter to take the screenshot and place an icon for its new JPEG on your desktop.
  3. In the Shutter window, close the image tab by clicking on its X, and then minimize the Shutter window.
  4. Double-click the new icon to display an image similar to Figure 5.
Figure 5 - A selected-rectangular-area screenshot.

4/17/2011

An ancient IBM vacuum-tube mainframe computer

In early 1957, I saw my first computer during a high-school field trip to an IBM office in Cleveland, Ohio. It was a vacuum-tube mainframe in the IBM 700 series. Though I can find no record of that particular IBM office, its mainframe was most probably an IBM 705 Data Processing System, which had been designed to process business data.

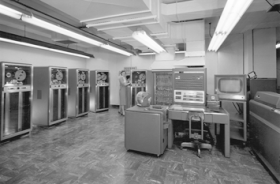
The office was a single, large, street-level room that combined a reception area and a data-processing workspace. An IBM employee, probably an office manager, gave us his 'grand tour,' which was lecturing to us while we stood in the center of the room. The equipment included an operator's station, a large card punch and reader, and a few cabinets for tape drives and power supplies. Through a glass wall, we could see multiple racks of glowing vacuum tubes in the back room.


Each IBM 700 series mainframe included a vacuum-tube processor, a magnetic-core memory and data-storage devices for punched cards and magnetic tape.

Vacuum-tube processor
A vacuum-tube processor in an IBM 700 series mainframe was roughly similar to the CPU in a modern PC. This processor executed program instructions, performed calculations, and communicated with magnetic-core memory and data-storage devices.

I had recently seen a classmate's transistor radio. Therefore, at the end of our host's 'sermon,' I asked him whether IBM would ever use transistors in its computers. He said, "No," and explained that transistors could never work as quickly as vacuum tubes.

Magnetic core memory
A magnetic-core memory in an IBM 700 series mainframe was roughly similar to RAM in a modern PC. This magnetic-core memory was the working memory through which the processor made calculations. A magnetic-core memory consisted of ferrite rings in a wired array, with three wires threaded through each ring. Current pulsed simultaneously through two wires would magnetize each ring in either of two directions (states), on or off (1 or 0). The third wire would sense a change in state.

Data-storage devices
Each IBM 705 mainframe would use data-storage devices to store data to, and retrieve it from, punched cards or magnetic tape. A business customer would use cards or tape to bring its payroll, or other business-operation data, to the IBM data center. After processing these data through its mainframe, IBM would use cards or tape to send the results to the customer.

Sources: