12/28/2014

Making a headers template for Google Blogger

Section headers can help make your Google Blogger posts (documents or articles) more readable and clear. This document shows how you can create section headers, and then use them in any document that you think requires them.

Although you need not use headers in every post, they can enhance any document in which you wish to highlight its organization. For example, in this document, I am using section headers to present two topics:
  • Creating your headers template
  • Using your template headers
Creating your headers template
You use this procedure to create a headers template similar to Figure 1.
Figure 1 - Example headers template
These are only example header styles; modify them as you wish. To create your headers template, do the following:
  1. If you haven't yet created a blog (weblog) through Blogger, go to the Blogger Getting Started Guide.
  2. Open Blogger, click Design, click New post, and then type Headers template in the Post title field.
  3. Create your level-1 section header as follows:
    1. Type your level-1 header in the default style (Normal), type some text for your new section immediately below its header, and then select (highlight for editing) the level-1 header text.
    2. Using the icons in the Blogger formatting toolbar, set Font to Ariel, set Font size to Large, click Bold, and then set Text color to dark red as shown in Figure 2.
      Figure 2 - Formatting text in level-1 template header
  4. Create your level-2 section header as follows:
    1. Type your level-2 header, type " - " (space, dash symbol, space), type some text for your new section, and then select the level-2 header text and its dash symbol.
    2. Set Font to Times, set Font size to Large, click Bold, and then set Text color to dark blue.
  5. Create your level-3 section header as follows:
    1. Type your level-3 header, type " - " (space, dash symbol, space), type some text for your new section, and then select the level-3 header text and its dash symbol.
    2. Set Font to Times, set Font size to Normal, click Bold, and then set Text color to dark green.
  6. Click Preview to verify that your headers appear correctly.
  7. Click Save and then click Close.
  8. Go to the Using your template headers section below.
Using your template headers
You never publish your headers template because you only copy its template headers and paste them into other documents that you do publish. To copy your template headers into a new document, do the following:
  1. Open Blogger, click Design, click Posts, click Draft, and then click Headers template to open it
  2. Select all three headers, press Ctrl+C to copy them, and then click Close.
  3. Click New post, type a document name in the Post title field, and then press Ctrl+V to paste the template headers into your new document.
  4. If you need headers while writing your document, copy each header, paste it where you need it, and then type over its header text. Start with at least two level-1 headers. Likewise, if you need any subheaders, use at least two level-2 subheaders under any level-1 header; and at least two level-3 subheaders under any level-2 subheader.
  5. When you finish writing your document, remove the template headers.

12/23/2014

Creating a Google Sites website

Google Sites lets you create and manage a free, simple, thoughtful, and elegant website. You need not write or edit any XHTML code. You can instead focus on creating website contents. This document contains procedures that explain how to:
  • Create website pages
  • Set up page hierarchy
  • Add a logo
  • Change font colors
  • Add images
  • Add internal links
  • Add external links
Although this short document cannot cover all features available in Google Sites, it can help you create a powerful website that you can later modify, and add as many features as you need. For more information, see Google Sites Help.

Creating website pages
You begin building your Google Sites website by creating its pages. To create your website pages, do the following:
  1. Log into Google Sites through your Google Account, such as your Gmail account, and then click Create new site to display its page as shown in Figure 1.
    Figure 1 - Create-new-site web page
  2. Select Blank template, and then type a name for your website, such as Luddites Online.
  3. Type a unique suffix to your new website URL, which begins with https//sites.google.com/site/- - -. Use only letters and/or numbers, such as - - - LudditesOnline57.
  4. Select a theme, such as Crystal Panel. Choose a theme according to the purpose of your website and what you think its visitors might like.
  5. Type the displayed security code, and then click Create to create your website and display its Home page. Note: As shown in Figure 2, while you are signed in to your website, each page has three icons at its top right: The pencil icon for Edit page, the page+ icon for Create page, and the gear icon for More actions.
    Figure 2 - Icons for Edit page (pencil), Create page (page+), and More actions (gear)
  6. Click Edit page, type appropriate text into your Home page, and then click Save. You can edit and reformat this text later.
  7. Click Create page (page+ icon), type a name for your new page, such as Animals, click Create Page, type text into your new page, and then click Save.
  8. Repeat step 7 for each new page you wish to add. For example, as shown in Figure 3, Dave's Example Website includes pages named Animals, Cats, Lions, Tigers, Bears, Plants, Trees, Grass, Minerals, Rocks, and Sand.
    Figure 3 - All pages are initially at level 1
  9. Click Sign out to close your Google Sites session. Optionally you can leave your session open if you wish to immediately change your website page hierarchy according to the Setting up page hierarchy section.
Setting up page hierarchy
To help your website visitors find information more easily, you should set up proper hierarchical levels for your website pages. To set up the hierarchical levels of your pages, do the following:
  1. If you are not already logged into Google Sites, log in, and then click your website name.
  2. Click More actions (gear icon), click Manage site, and then click Pages.
  3. Use drag and drop to set up the hierarchy of each subpage by moving it into the Home page or any appropriate page to which you assign greater hierarchy. A page can be a subpage that has lower-level subpages as shown in Figure 4. 
    Figure 4 - Pages at hierarchical levels 1, 2, 3, and 4
    In this instance, Dave's Example Website includes:
    • A level-1 Home page that has greater hierarchy than its level-2 Animals, Minerals, and Plants subpages, which have been dragged into Home.
      • A level-2 Animals page that has greater hierarchy than its level-3 Bears and Cats subpages, which have been dragged into Animals.
        • A level-3 Cats page that has greater hierarchy than its level-4 Lions and Tigers subpages, which have been dragged into Cats.
      • A level-2 Minerals page that has greater hierarchy than its level-3 Rocks and Sand subpages, which have been dragged into Minerals.
      • A level-2 Plants page that has greater hierarchy than its level-3 Grass and Trees subpages, which have been dragged into Plants.
  4. Click your website name to return to its Home page.
  5. Click More actions (gear icon), click Edit site layout, and then click Navigation (in the sidebar) to display the Configure navigation dialog.
  6. Set the Level of pages to show to all, click OK to close the navigation window.
  7. Click Close to save your changes and redisplay your website.
Adding a logo
A logo enhances your website. To add a logo through Google Sites, do the following:
  1. If you are not already logged into Google Sites, log in, and then click your website name.
  2. Click More actions (gear icon), click Edit site layout, place your mouse pointer within the header until it displays an Edit site header prompt, and then click the header to display a Configure site header window. 
  3. Select Custom Logo, browse for and select your logo image file (such as LuditeLogo.jpg), and then click OK to close the header window.
  4. Verify that your logo displays correctly. 
  5. Click Close to save your changes and redisplay your website.
Changing font colors
Changing certain font colors can enhance your website. Be careful to use no more than a few colors; too many can be distracting. To change font colors, do the following:
  1. If you are not already logged into Google Sites, log in, and then click your website name.
  2. Click More actions (gear icon), click Manage site, and then click Themes, Colors, and Fonts to display a window, similar to Figure 5.
    Figure 5 - Font-color dropdown pallet
     Here, you can make changes to:
    • Entire page
    • Header area
    • Content area
    • Content area gadgets
    • Sidebar gadgets
    • Horizontal navigation
  3. Select an area to change (such as Content area), select an item to alter (such as Page title) select the Color dropdown pallet, and then select a color.
  4. As needed, repeat step 3 for any other areas and items, and then click Save.
Adding images
Images can help your website visitors understand the subjects your website presents. To add images, do the following:
  1. If you are not already logged into Google Sites, log in, and then click your website name.
  2. Select a page into which you wish to add an image, such as a photo or drawing, as an image file. An image file is typically a JPEG or GIF file.
  3. Click Edit page (pencil icon), and then place your insertion point (blinking cursor) wherever you wish to add the image. For example, you might wish to place the image between two paragraphs.
  4. Click Insert, and then click Image, to display an Add an image window.
  5. Select either Uploaded Images or Web Address (URL)
  6. Select the image file you wish to add (such as 03_LudditesOnline.jpg), and then click OK to add the image.
  7. Click the image to display its menu, in which the first three icons let you align the image. For example, you would click Align center (second icon) to center the image.
  8. The next five icons let you resize the image. For example, you can click L to resize the image to large.
  9. Repeat steps 2 through 8 for each image you wish to add, and then click Save.
Adding links
You can add both internal and external links to your website:
  • An internal link lets your website visitor click on that link to display another page within your website. 
  • An external link, which is also called a hyperlink, lets your website visitor click on that link to display another website.
Note: To compare an internal link with an external link, see Sample Links.

Adding internal links - To add internal links to your website, do the following:
  1. If you are not already logged into Google Sites, log in, and then click your website name.
  2. On any page in your website, click Edit page, select (highlight) any word or phrase that you wish to link to another page within your website.
  3. Click the Add or remove link icon to display a Create Link window. 
  4. Click Sites page, type a page name or use the Site map to select a page, click OK, and then click Save.
  5. Repeat steps 2 through 4 for each internal link you wish to create.
Adding external links - To add external links to your website, do the following:
  1. If you are not already logged into Google Sites, log in, and then click your website name.
  2. On any page in your website, click Edit page, select (highlight) any word or phrase that you wish to link to another website.
  3. Open the website to which you wish to link, and copy its URL.
  4. Click the Add or remove link icon to display a Create Link window. 
  5. Click Web address, type or paste a URL, click OK, and then click Save.
  6. Repeat steps 2 through 5 for each external link you wish to create.

12/19/2014

Mouse dongles interfere with Chromebook touchpads

A dongle (USB connector) for a wireless mouse can cause intermittent problems with the touchpad on a Chromebook. Therefore, as explained in this document, you should always unplug the dongle before using the touchpad. 

Note: This document applies to all portable computers, specifically to Chromebooks and generally to laptop PCs.

While getting started with your Chromebook, you might plan using only a wireless mouse, never the touchpad. You might decide to leave the dongle plugged in at all times as shown in Figure 1. However, should you later want to use the touchpad, it will almost certainly not work properly until you unplug the dongle. Your touchpad should always work as described in Chromebook touchpad tips.

Figure 1 - While using a wireless mouse (instead of the touchpad)
with your Chromebook, connect the dongle to a USB port. 
Note: When I started using a Chromebook, I didn't want to bother with the touchpad. Therefore, I never unplugged the dongle. When I gradually started using the touchpad, and having intermittent problems, I thought I was just too clumsy for the touchpad. Recently, I wondered whether removing the dongle might let the touchpad work correctly. To my astonishment, it immediately worked properly and smoothly.

Each wireless mouse works only with its own dongle. If you lose the dongle, your mouse is useless. Therefore, while not using the dongle, you should keep it in its storage slot, which is inside the mouse as shown in Figure 2.
Figure 2 - While using the touchpad (instead of a wireless mouse) with
your Chromebook, disconnect the dongle and store it in the mouse.


12/17/2014

Enhancing Python GUI through ttk styles

This document can help you enhance your Python graphical user interface (GUI) windows by applying styles to your data-entry ttk widgets. For more information about ttk widgets, please see Tkinter (ttk) graphical user interface for Python. For more information about applying styles to ttk widgets, please see Python Software Foundation Library - ttk styling.

This document presents two example Python programs that you can download, install, and run. The first generates a window that contains ttk widgets without styles. The second generates ttk widgets with styles.

Note: Before you can download and run the example code in this document, you need to download and install Python 3 and IDLE for Python 3. IDLE is the Python integrated development environment (IDE). For details, see Getting Started with Python Programming.

Running example ttk widgets without styles
To download and run the Python code for example ttk widgets that have no styles, do the following:
  1. In a new browser window or tab, go to Ttk_Widgets_Without_Styles.
  2. Select the entire program, and then press Ctrl+C to copy the code.
  3. Start Python 3 and open a new window in IDLE.
  4. Click File, click New File, and then press Ctrl+V to paste your copied code into your new file.
  5. Save your new file with an appropriate file name, such as ttkWidgetsNoStyles.py
  6. Click Run Module to verify that the code generates a Ttk Widgets Without Styles window similar to that in Figure 1.
  7. Test the window by experimenting with its buttons and its numeric-value entry field.
Figure 1 - Example ttk widgets to which styles have not been applied.
Running example ttk widgets with styles
To download and run Python code for example ttk widgets that have styles, do the following:
  1. In a new browser window or tab, go to Ttk_Widgets_With_Styles.
  2. Select the entire program, and then press Ctrl+C to copy the code.
  3. Start Python 3 and open a new window in IDLE.
  4. Click File, click New File, and then press Ctrl+V to paste your copied code into your new file.
  5. Save your new file with an appropriate file name, such as ttkWidgetsWithStyles.py
  6. Click Run Module to verify that the code generates a Ttk Widgets With Styles window similar to that in Figure 2.
  7. Test the window by experimenting with its buttons and its numeric-value entry field.
Figure 2 - Example ttk widgets to which styles have been applied.
Comparing the example programs
To help you get started with ttk styles, the two subsections below let you compare example Python code fragments that generate ttk widgets without styles and with styles.

Note: Figures 3 and 4 show example Python code fragments as copied into word-processor text.

Generating ttk widgets without styles - The code fragment in Figure 3 generates ttk widgets for labels and buttons shown in Figure 1. This code does not define or apply styles to these widgets.
Figure 3 - Example code fragment that defines ttk widgets without styles.
Generating ttk widgets with styles - The code fragment in Figure 4 generates ttk widgets for labels and buttons shown in Figure 2. As shown in highlighted text, this code defines styles for the label and button widgets. It also applies a custom style to the Exit button.

Note: You can define a default widget color as a literal string in double quotes, such as "red." You can define a custom color as a hexadecimal string in single quotes, such as '#afd' in the Exit.Tbutton style. You can define a widget border relief as a literal string in double quotes, such as "solid," "flat", "raised", "sunken", "groove" or "ridge."
Figure 4 - Example code fragment that defines ttk widgets with styles.
The highlighted code defines the styles.


12/13/2014

Fixing a LibreOffice Calc 3D spreadsheet problem

If you use LibreOffice Calc for one or more 3D spreadsheets, they might recently have stopped working correctly. If you have this problem, this document might help you fix it.

I use LibreOffice on a Linux PC. Recently, my Calc 3D spreadsheet lost its ability to share information among its separate sheets. Sheet names disappeared from the formulas that referenced cells in other sheets. I don't know what has caused this problem; it could be a bug in an update to LibreOffice Calc.

If you also have this problem, your might see either incorrect data or an error message similar to that in Figure 1. In this example, the original formula in cell E8 was '=Qtr1.E8+E7,' which adds the value in cell E8 of sheet Qtr1 (First Quarter) to the value in cell E7 of this sheet, Qtr2. The problem caused 'Qtr1.' to disappear.
Figure 1 - The missing sheet name causes an error, Err:522.
To correct this problem, you would simply type Qtr1. (including the period) after the '=' sign and prior to the 'E8+E7' in formula field as shown in Figure 2.
Figure 2 - Restoring the sheet name, 'Qtr1.' corrects the error.

11/30/2014

Tkinter (ttk) graphical user interface for Python

This document shows how to program a Python Tkinter Themed Tk (ttk) graphical user interface (GUI) for both text and numerical data entry. Tkinter ttk provides enhanced widgets that can simplify creating GUI windows.

Note: Before you can program and run ttk data-entry widgets, you need to download and install Python 3 and IDLE for Python 3. IDLE is the Python integrated development environment (IDE). For details, see Getting Started with Python Programming.

Creating a ttk planning grid
Before you start programming your ttk GUI window, you should create a planning grid that helps you organize your Entry, Label and Button widgets into rows and columns. To create your ttk grid, you can either make a pencil sketch or use a word-processor table similar to Figure 1.
Figure 1 - You can use a word-processor table to create your ttk planning grid.

Note: Compare Figure 1 with Figures 2 and 3. Figure 2 shows the initial example window. Figure 3 shows the results of entering data into that window.
Figure 2 - Example ttk GUI window prior to data entry.
Figure 3 - Example ttk GUI window after data entry.
Programming a ttk GUI window
The example Python program in Figures 4 and 5 contain Python code that defines the example ttk GUI window in Figures 2 and 3. Note: A # character precedes each comment.

Figure 4 includes code that:
  • Imports both tkinter and ttk.
  • Defines callable GUI functions using the get() and set() control-variable  methods:
    • The texter() function gets input data for variable 'textin,' and sets the output data for variable 'textout.'
    • The adder() function gets input data for variables 'a' and 'b,' and sets the output data for the variable 'total.
    Figure 4 - This ttk example code includes function definitions.
Figure 5 includes code that:
  • Sets up a self-sizing GUI window based on the example ttk planning grid in Figure 1.
  • Defines two ttk.Button widgets:
    • According to planning grid row 3, column 3, 'command=texter'  calls the texter() function in Figure 4.
    • According to planning grid row 7, column 3, 'command=adder'  calls the adder() function in Figure 4.
Figure 5 - This ttk example code sets up the GUI window
and defines two button widgets.
Running the ttk example
Before you can run the ttk example Python program, you need to either download (or type) it into into a new file.

Downloading and running the ttk example - To download and then run the example ttk, do the following:
  1. In a new browser window or tab, go to Tkinter ttk Data Entry.
  2. Select the entire program, and then press Ctrl+C to copy the code.
  3. Start Python 3 and open a new window in IDLE.
  4. Click File, click New File, and then press Ctrl+V to paste your copied code into your new file.
  5. Save your new file with an appropriate file name, such as TtkExample.py, and then click Run Module.
  6. Test the ttk example by entering text and numerical values. See Figures 2 and 3.
Typing and running the ttk example
If you are new to Python, you might wish to type the example ttk as extra practice. To type and run the example GUI, do the following:
  1. Start Python 3 and open a new window in IDLE.
  2. Click File, click New File, and then type the code from Figures 4 and 5 into your new file. 
  3. Save your new file with an appropriate file name, such as TtkExample.py, and then click Run Module.
  4. Test the ttk example by entering text and numerical values. See Figures 2 and 3.

11/27/2014

Tkinter graphical user interface for Python

Tkinter is the most popular graphical user interface (GUI) for the Python programming language. Tkinter automatically installs with Python. This document describes example code through which you can create a new desktop window that contains active buttons and dynamic labels.

I thank Webucator for creating an excellent video presentation based on this document, and including it in a free lesson, Python Solutions from the Web. Webucator also provides commercial Python Online and Onsite Training Classes.

Note: Before you can create and run the example program in this document, you need both Python 3 and IDLE for Python 3, which is its Integrated Development Environment (IDE). For more information, see Getting started with Python programming.

Example GUI overview
Figjures 1, 2 and 3 contain the example GUI example code. Note: In these figures, # characters precede red comment text that shows how Tkinter widgets define these example buttons and labels.

Figure 1 - This code defines the Button Test window,
its instruction text, and its Exit Program button.
Figure 2 - This code defines the GREEN and BLUE buttons.
Figure 3 - This code defines the Reset button.
Downloading and running the example GUI
To download and then run the example GUI, do the following:
  1. In a new browser window or tab, go to Tkinter Buttons and Labels.
  2. Select the entire program, and then press Ctrl+C to copy the code.
  3. Start Python 3 and open a new window in IDLE.
  4. Click File, click New File, and then press Ctrl+V to paste your copied code into your new file.
  5. Save your new file with an appropriate file name, such as TkinterExample.py, and then click Run Module.
  6. Test the buttons according to the Testing the example GUI section below.
Typing and running the example GUI
If you are new to Python, you might wish to type the example GUI as extra practice. To type and run the example GUI, do the following:
  1. Start Python 3 and open a new window in IDLE.
  2. Click File, click New File, and then type the code from Figures 1, 2, and 3 into your new file. 
  3. Save your new file with an appropriate file name, such as TkinterExample.py, and then click Run Module.
  4. Test the buttons according to the Testing the example GUI section below.
Testing the example GUI
After downloading or typing the example GUI, test it as follows:
  1. Click the GREEN button to display "You clicked the green button" in its label field.
  2. Click the BLUE button to display "You clicked the blue  button."
  3. Click the RESET button should clear the label fields for the GREEN and BLUE buttons.
  4. Repeat steps 1 through 3 to verify that the print() functions display correctly in the Python Shell. For example, clicking the BLUE button should also display "Thank you for clicking the BLUE button" as shown in Figure 4.
  5. Click the Exit Program button to close the Button Test window.
Figure 4 - Clicking the BLUE button should display one message in the
Button Test window, and another in the Python Shell window.

10/23/2014

Using Python to generate humorous memos

The Python programming language lets you generate humorous memos automatically. This document includes an example Python 3 program that generates random humorous memos. This code includes word lists (arrays), function definitions, and nested while loops. The word lists contain various verbs, adverbs, objects, adjectives and subjects for use in sentences. The program code defines functions that select random words to generate sentences. The nested while loops generate paragraphs and sentences. 

Python is free to download, install, and use. It's easy to program and delightful to run. Before trying the example program in this document, you need to install Python 3 on your computer. For more information, see Getting started with Python programmingFor information about random functions, see Using Python random functions to create new words.

Example Python program for automatic memos

Figures 1 through 3 show example Python code that can generate automatic memos. To run this code on your computer, do the following:
  1. Install Python 3 if you've not already done so.
  2. Run the interface development environment (IDE) for your Python 3.
  3. Copy AutomaticWriter and then paste it into an appropriate Python 3 window.
  4. Run the program and, at the prompt, type the number of paragraphs you want in your memo, such as 4.
  5. Press Enter to generate and display a random memo with a random title, such as 'Radically Downsize Plaintiffs."
  6. Repeat steps 4 and 5 until the program generates a sufficiently humorous memo. You can save your memo by copying its text to a word processor.
  7. Experiment with this program by modifying your copy of it. For example, you can add words and phrases most appropriate to your friends. 

Word lists 

The Python lists in Figure 1 contain the possible words and phrases that can appear in a memo generated by this Python program. The name of each list describes the grammatical function of its items:
  • ucverb -- upper-case verbs, such as Exploit or Ridicule
  • lcverb -- lower-case verbs, such as exploit or ridicule
  • ucadvrb -- upper-case adverbs, such as Carefully or Instantly
  • lcadvrb -- lower-case adverbs, such as carefully or instantly 
  • objct -- objects, such a customers or safety inspectors
  • adjctv -- adjectives, such as uninspired or repugnant
  • sbjct -- subjects, such as We or Human resources
  • auxlry -- auxiliaries, such as should always or must
  • ttlobj -- title objects, such as Regulators or Wall Street Brokers
Figure 1 - These lists contain words and phrases as verbs, adverbs, objects,
adjectives, subjects, auxiliaries, and title objects. When the the Python code in
Figure 3 calls the 
title () function, it randomly chooses title words,
concatenates them, and then returns the title to the function caller.
The 
sntnc01 () function similarly defines sentence type 01.

Function definitions

The functions defined in Figures 1 and 2 make random.choice () function calls to return random words or phrases for the title and six sentence types. For example, the title () function is:
def title (ucadverb,ucverb,ttlobj):
    a = random.choice (ucadvrb)
    b = 
random.choice (ucverb)
    c = random.choice (ttlobj)
    r = a + ' ' + b + ' ' + c
    return
(r)

When the code in Figure 3 calls the title () function, it makes three random.choice () function calls that select:
  • One upper-case adverb from the ucadvrb list
  • One verb from the ucverb list
  • One title object from the ttlobj list
The title () function then concatenates these words and returns them as the title of the automatic memo. Likewise, when the code in Figure 3 calls one of the sentence-type functions below, it returns an appropriate sentence:
  • The sntnc01 () function makes three random.choice () function calls that select three words for sentence type 01, concatenates those words, and then returns them as a sentence type 01 within the automatic memo. Note: Figure 1 includes the sntnc01 () function. Figure 2 includes the sntnc02 () through sntnc06 () functions.
  • The sntnc02 () function makes three random.choice () function calls that select three words for sentence type 02, concatenates those words, and then returns them as a sentence type 02 in the automatic memo.
  • The sntnc03 () function selects, concatenates and returns four words for sentence type 03.
  • The sntnc04 () function selects, concatenates and returns five words for sentence type 04.
  • The sntnc05 () function selects, concatenates and returns four words for sentence type 05.
  • The sntnc06 () function selects, concatenates and returns five words for sentence type 06.
Figure 2 - These functions define sentence types 02 through 06. [Note: Figure 1 includes the sntnc01 () function.] When the Python code in Figure 3 calls any sentence-type function, sntnc01 () through sntnc06 (), it randomly chooses sentence words or phrases, concatenates them, and then returns them as a sentence.

Nested while loops

The Python code in Figure 3 generates a random memo as follows:
  1. The title () function generates a random title.
  2. The outer while loop generates a user-specified number of paragraphs. Each pass through the outer (paragraph) loop:
    1. Calls the random.randint () function to specify between three to nine sentences as the paragraph length. 
    2. The inner loop generates sentences. Each pass through the inner (sentence) loop:
      1. Calls the the range (1,6) function to set the switch value to 1 to 6.
      2. Calls the random.choice (switch) function to call a sentence-type function,  sntnc01 () to sntnc06 (). The sentence-type function generates its random sentence.
      3. Concatenates the sentence to the paragraph.
    3. Calls the print () function to display the paragraph.
  3. Various print () functions display ending text, such as corporate guidance and manager names.
Figure 3 - These nested while loops create paragraphs and sentences. The user specifies the number of paragraphs; the outer while loop runs for each paragraph. The inner while loop calls 3 to 9 sentence-definition functions for each paragraph.

Example reformatted memo

If you wish to format any random memo generated by your Python 3 program, simply copy its text and then paste it into a word processor document as shown in Figure 4.
Figure 4 - This automatic memo was copied to a  word-processor
document, and then exported as a PDF.

10/17/2014

Using Python random functions to create new words

The Python programming language lets you randomly select syllables and then concatenate (combine) them to generate new words. This document explains how to control syllable concatenation through Python random functions.

Python is free to download, install, and use. It is easy and fun to program. Before trying the examples in this document, you need to install Python 3 on your computer. For more information, see Getting started with Python programming.

Using Python random functions

Python random functions generate random values that you can use directly or for other purposes, such as selecting list items randomly. For more information, about random functions, see see Wikibooks: Python Random Numbers. For really geeky details, see Python Library: Random Numbers.

Figure 1 shows how you can use a few fundamental Python random functions. If you want try this code, you can either type it from Figure 1 or copy it from its NwWrdsRdmBasics online example.

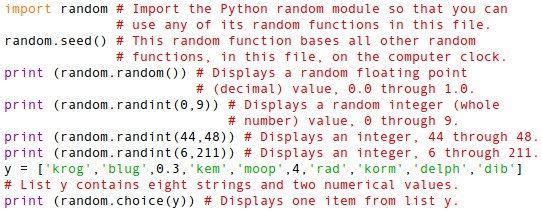
Figure 1 - This example Python code demonstrates a few random-function 
capabilities, such as basing random values on the computer clock, 
returning a random floating point value, returning a random integer value,
 and returning a random item from a list.
In Figure 1:
  • The 'import random' statement imports the Python random module so that you can use random functions in this example code.
  • The random.seed() function bases all random functions on the computer clock.
  • Each print() function displays the number or string returned by its random function.
  • The random.random() function returns a random floating point (decimal) value, 00 through 1.0.
  • Each random.randint(a,b) function returns a random integer (whole number) value, in the range a through b.
  • The random.choice(y) function randomly selects and returns one item from list y.
Figure 2 demonstrates how you can use two Python random functions to create a large random decimal value. If you want try this code, you can either type it from Figure 2 or copy it from its NewWrdsRdmLgFloat online example.

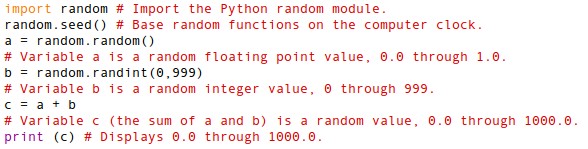
Figure 2 - This example Python code demonstrates
creating a large random decimal value.
In Figure 2:
  • The 'a = random.random()' statement assigns a floating point value, 0.0 through 1.0, to variable a.
  • The 'b = random.randint(0,999)' statement assigns an integer value, 0 through 999, to variable b.
  • The 'c = a + b' statement assigns the sum of a and b to variable c.
  • The print (c) function displays a large random decimal value, such as 467.33257201.

Concatenating Strings in Python

A string is a variable that consists of one or more characters. Python lets you concatenate strings by placing them in sequence with no spaces among them. In Python, plus signs let you either add numerical values or concatenate strings.

Figure 3 demonstrates adding numerical values and concatenating strings.

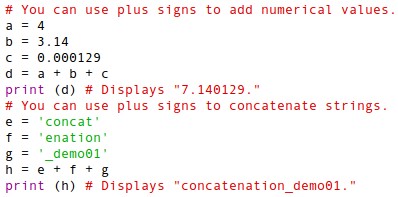
Figure 3 - This example Python code demonstrates
using plus signs to either add values or concatenate strings

In Figure 3:
  • The 'd = a + b + c' statement assigns the sum of a, b, and c to variable d. Variables a, b, and c must be numerical values; for addition, none can be strings.
  • The 'h = e + f + g' statement assigns concatenated strings e, f, and g to variable h. Variables e, f, and g must be strings; for concatenation, none can be numerical values.

Creating New Words in Python

To create a new word in Python, you need to randomly choose syllable strings from a list, and then concatenate those syllables.

Note: Beyond demonstrating Pythom random functions and concatenation, creating new words can be useful. For example, if you write science fiction, you can use a Python program to create new space-alien expletives, such as "tulktokloogkek," "garfblugtonk," and "loogblug." However, you need not write science fiction. For example, if you are expecting a baby, why not give him or her an original name, such as "Depgarf?"

Figure 4 shows how you can use Python random functions and concatenation to create a two-, three-, four-, or five-syllable new, random word.

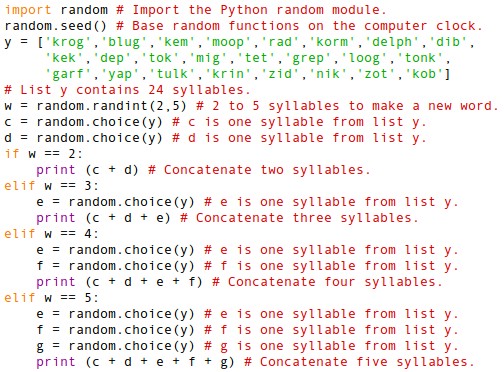
Figure 4 - This example Python code demonstrates
randomly selecting syllables from a single list of strings,
and then concatenating them to create a new word.
Syllables can repeat sequentially
In Figure 4:
  • The 'w = random.randint(2,5)' statement assigns an integer value, 2 through 5, to variable w. This determines whether the new word contains two, three, four, or five syllables.
  • The 'c = random.choice(y)' statement assigns one random syllable string, from list y, to variable c. Likewise, the 'd = random.choice(y)' statement assigns one random syllable to variable d. Note: Variables c and d apply to words that have two or more syllables. Variable e applies to words that have three, four or five syllables.  Variable f applies to words that have four or five syllables. Variable g applies to words that have five syllables.
  • The 'if w == 2:' control flow statement executes the 'print (c + d)' function, which concatenates and displays a two-syllable word, only if w is equal to 2.
  • The 'elif w == 3:' control flow statement executes the 'e = random.choice(y)' statement and the 'print (c + d +e)' function, which concatenates and displays a three-syllable word, only if w is equal to 3.
  • The 'elif w == 4:' control flow statement executes the 'e = random.choice(y)' statement, the 'f = random.choice(y)' statement, and the 'print (c + d +e +f)' function, which concatenates and displays a four-syllable word, only if w is equal to 4.
  • The 'elif w == 5:' control flow statement executes the 'e = random.choice(y)' statement, the 'f = random.choice(y)' statement, the 'g = random.choice(y)' statement, and the 'print (c + d +e +f +g)' function, which concatenates and displays a five-syllable word, only if w is equal to 5. Note: If you wish, you can edit the syllable strings in list y. You can also add or delete them.
Figure 5 shows how you can modify the example code in Figure 4 so that it prevents sequential duplicate syllables. (After all, many kids might ridicule one named 'zotzot.')

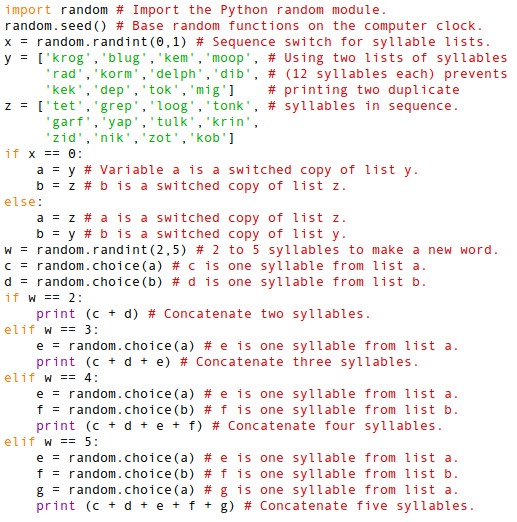
Figure 5 - This example Python code demonstrates
randomly selecting syllables from two lists of strings,
and then alternately concatenating the strings to create a new word.
Syllables cannot repeat sequentially.
In Figure 5:
  • The 'x = random.randint(0,1)' statement assigns either 0 or 1 to variable x.
  • Lists y and z each contain half the syllable strings.
  • The if and else control flow statements determine which list provides the first syllable. If x is 0, list a is a switched copy of list y, and list b is a copy of list z. If x is 1, list a is a copy of list z, and list b is a copy of list y.
  • The remaining code in Figure 5 is similar to that in the Figure 4.

10/14/2014

Getting started with Python programming

Python is a powerful, high-level, object-oriented programming language. It's free to download and install because it's open-source software. In comparison with other programming languages, it has a simpler, more-intuitive syntax. Therefore, as this document shows, Python is easy to learn and fun to use. For more information, see the following Python tutorials:
You can choose either of two Python versions, 2 or 3. Python 2 is primarily a legacy version. Therefore, you should probably choose version 3 unless you specifically need Python 2. For more information, see Should I use Python 2 or Python 3?

Python is probably already installed on your computer. If not, you can install it according to information in Python Setup and Usage. Currently, in October, 2014, Python 3.4 is the newest version.

Note: Though tested on Xubuntu 14.04, the procedures in this document generally apply to Python on all PC operating systems; Linux, OS X, and Windows. Xubuntu is an XFCE-desktop distribution of the Ubuntu Linux operating system.

This document can help you:
  • Install IDLE, which is an Integrated Development Environment (IDE) for Python.
  • Write your first Python program.
  • Run your first Python program.
  • Run example Python programs that demonstrate:
    • Math operations
    • While loops
    • Nested while loops
Installing IDLE
Although you can program Python through your command-line terminal, programming through IDLE is easier. Install IDLE according to your particular operating system. For example, to install IDLE on Xubuntu 14.04, do the following:
  1. Click Applications Menu (a white-mouse icon at the upper left of the screen) to display the Applications Menu.
  2. Click Ubuntu Software Center to display its window, type python into the search field, and then select IDLE (using Python 3.4).
  3. Click Install to display the Authenticate window, type your password, and then click Authenticate.
  4. After you have installed IDLE, close the Ubuntu Software Center window.
Note: The Ubuntu Software Center has a nice feature that can display the path to a software package you have just installed. For example, after you install IDLE (using Python-3.4), you can click More info to display Applications > Programming > IDLE (using Python-3.4). Of course, this applies only to software that you can launch through the Applications Menu.

Writing your first Python program
To write your first Python program through IDLE, do the following:
  1. Install IDLE according to the section above.
  2. Create a folder in which to store your Python programs. For example, you can create a MyPython folder within your home folder.
  3. As shown in Figure 1, click the white-mouse Applications Menu, select Development, and then click IDLE (using Python 3.4) to display a Python Shell window as shown in Figure 2.
    Figure 1 - Starting IDLE
    Figure 2 - Python Shell
  4. Click File, and then click New Window to display an Untitled program window.
  5. Type a Python program, such as the Example Python Hello code shown in Figure 3. Note: To enter a comment into a Python program, type # before the comment text. Computers do not execute comments. The Python interpreter ignores all comments while converting your program statements to machine code.
    Figure 3 - Writing your first Python program
  6. Click File, click Save as, select your MyPython folder, type a file name such as hello.py, and then click Save.
  7. Close both IDLE windows, which are the Python Shell and the program window.
  8. Test your program by running it according to the section below.
Running your first Python Program
To run your first Python program through Idle, do the following:
  1. Click Applications, select Programming, and then click IDLE (using Python 3.4) as shown in Figure 1.
  2. In the Python Shell, click File, click Open, select your MyPython folder, select the program you want to run, such as hello.py, and then click Open to display the program window.
  3. Click Run, and then click Run Module to run your program. It displays its output in the Python Shell as shown in Figure 4.
    Figure 4 - Testing your first Python program
  4. Close both IDLE windows, which are the Python Shell and the program window.
Running example Python programs
After writing and running your first Python program according to the sections above, you can copy and run other example Python programs, such as those that demonstrate:
  • Math operations
  • While loops
  • Nested while loops
Running example Python math operations - The Example Python program in Figure 5 demonstrates a few Python math operations and functions:
  • Included math operations let you enter two variables for:
    • Addition
    • Subtraction
    • Multiplication
    • Division
    • Raising a value by an exponent
    • Finding the root of a value
  • Included functions are:
    • float(), which defines a decimal value function
    • input(), which lets a user enter a value
    • print(), which displays data on a computer screen
Figure 5 - Example Python math operations
To enter a value for a variable, you can use an input() function nested within a float() function. An input() function can contain text in quotes to prompt data entry. The nested float(input()) function defines its data as a decimal value. For example, if you type 3, the data is 3.0.

The print() function displays data in a window, it does not print on paper. The print() function can display text in quotes, one or more variables, or both. Additionally, the print() function can contain and display a math operation, such as x+y.

To write and run the Example Python Math Operations program, do the following:
  1. As shown in Figure 1, click the white-mouse Applications Menu, select Development, and then click IDLE (using Python 3.4) to display a Python Shell window as shown in Figure 2.
  2. Click File, and then click New Window to display an Untitled program window.
  3. Type the Example Python Math Operations code shown in Figure 5. Note: As a new programmer, you can learn more by typing all this code. However, as an alternative, you can copy the code from XmplMathOperations and then paste it into the program window.
  4. To save your program for later use, click File, click Save as, select your MyPython folder, type a file name, such as xmplmath.py, and then click Save.
  5. In the program window, click Run, and then click Run Module to run your program in the Python Shell window. While your program is running, follow its prompts to enter data and/or make selections.
  6. Run the program multiple times, experimenting with different values for the x and y variables.
Running an example Python while loop - The Example Python program in Figure 6 demonstrates the Python while and if statements.
Figure 6 - Example Python while loop
Variable t is the total. Variable m is maximum total limit. The while statement defines the start of the while loop, which loops while t<=m (the total is less than the limit). Each time the loop runs, you can add a value to the total. As soon as the total exceeds its limit, the if statement ends the loop, and stops printing the Current Total.

To write and run the Example While Loop program, do the following:
  1. As shown in Figure 1, click the white-mouse Applications Menu, select Development, and then click IDLE (using Python 3.4) to display a Python Shell window as shown in Figure 2.
  2. Click File, and then click New Window to display an Untitled program window.
  3. Type the Example Python While Loop code shown in Figure 6. Note: As an alternative, you can copy the code from XmplWhileLoop and then paste it into the program window.
  4. To save your program for later use, click File, click Save as, select your MyPython folder, type a file name, such as xmplwhile.py, and then click Save.
  5. In the program window, click Run, and then click Run Module to run your program in the Python Shell window. While your program is running, follow its prompts to enter data and/or make selections.
  6. Run the program multiple times, experimenting with different values for the t, m, and v variables.
Running example Python nested while loops - The Example Python program in Figure 7 demonstrates how to run one while loop within another. The outer while loop is new. The inner while loop is the same as the Example While Loop in the section above.
Figure 7 - Example Python nested while loops
The variable i counts how many passes the outer loop has made. The variable p defines how many passes the outer loop can make. The int() function defines p as an integer value (no decimal point). Within each outer loop pass, the inner loop runs while t<=m (the total is less than the limit). Each time the inner loop runs, you can add value to the total. As soon as the total exceeds its limit, the if statement ends the inner loop, and stops printing the Current Total. The outer loop stops running after i is equal to or greater than p.

To write and run the Example Nested While Loops program, do the following:
  1. As shown in Figure 1, click the white-mouse Applications Menu, select Development, and then click IDLE (using Python 3.4) to display a Python Shell window as shown in Figure 2.
  2. Click File, and then click New Window to display an Untitled program window.
  3. Type the Example Python While Loop code shown in Figure 7. Note: As an alternative, you can copy the code from XmplNestedWhileLoops and then paste it into the program window.
  4. To save your program for later use, click File, click Save as, select your MyPython folder, type a file name, such as xmplnestedwhile.py, and then click Save.
  5. In the program window, click Run, and then click Run Module to run your program in the Python Shell window. While your program is running, follow its prompts to enter data and/or make selections.
  6. Run the program multiple times, experimenting with different values for the i, p, t, m, and v variables.